If you've lost a lot of upper jaw bone and can't get stable teeth with traditional implants, zygomatic implants might be your answer. They anchor right into your cheekbone, skipping over the weak upper jaw.
You can usually avoid drawn-out bone grafts for dental implants and get a fixed prosthesis sooner because these implants use the zygoma's dense bone for support.
Let's break down who usually qualifies, how the surgery and prosthetic process actually work, what kinds of improvements you might see, and which risks or recovery steps you'll want to keep in mind.
Eligibility Criteria and Surgical Candidacy
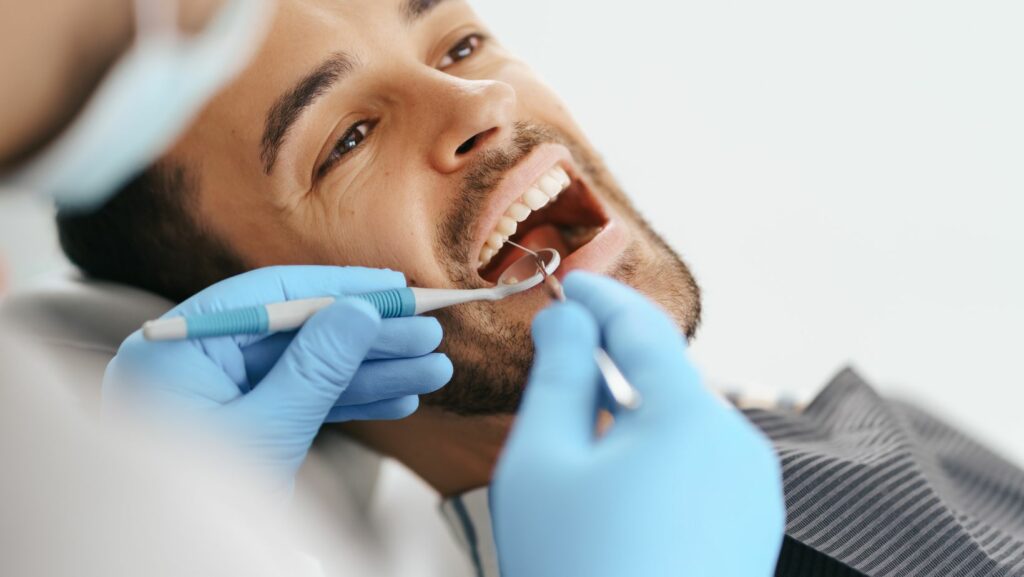
You’ll need a thorough evaluation to see if zygomatic implants are a fit. That means checking your anatomy, dental history, and overall health.
Key points? How much bone you’ve got left, any past implant or graft failures, your sinus shape, and your general health status.
Patient Assessment for Severe Maxillary Bone Loss
First, your dentist will check how much maxillary bone you have left. They’ll measure ridge height and look for resorption patterns.
Zygomatic implants usually come into play when there just isn’t enough bone for regular implants. If you’ve tried bone grafts, sinus lifts, or implants before and they didn’t work, that matters for planning.
Your oral hygiene, gum health, and smoking habits all play a role—poor hygiene and heavy smoking can make complications more likely.
Systemic health matters too. Uncontrolled diabetes, recent head or neck radiation, or bleeding disorders can all raise surgical risk and sometimes rule you out.
You should talk about your expectations for immediate teeth and prosthetic design. Make sure your goals line up with what’s actually possible.
Indicators for Alternative Treatment Over Traditional Implants
Consider zygomatic implants if regular implants or grafting would be too complicated or unlikely to work. If you’ve got severe bone loss in the back of your upper jaw, or grafts have failed before, these might be your best bet.
If your sinus anatomy is tricky but workable, zygomatic implants can bypass weak bone. On the other hand, if you have manageable bone loss or health problems that make longer surgery risky, traditional implants or hybrid options might be safer.
It’s worth talking through all the alternatives with your clinician. Risks, recovery, and maintenance all factor in.
Your anatomy and health really guide whether zygomatic implants make sense for you.
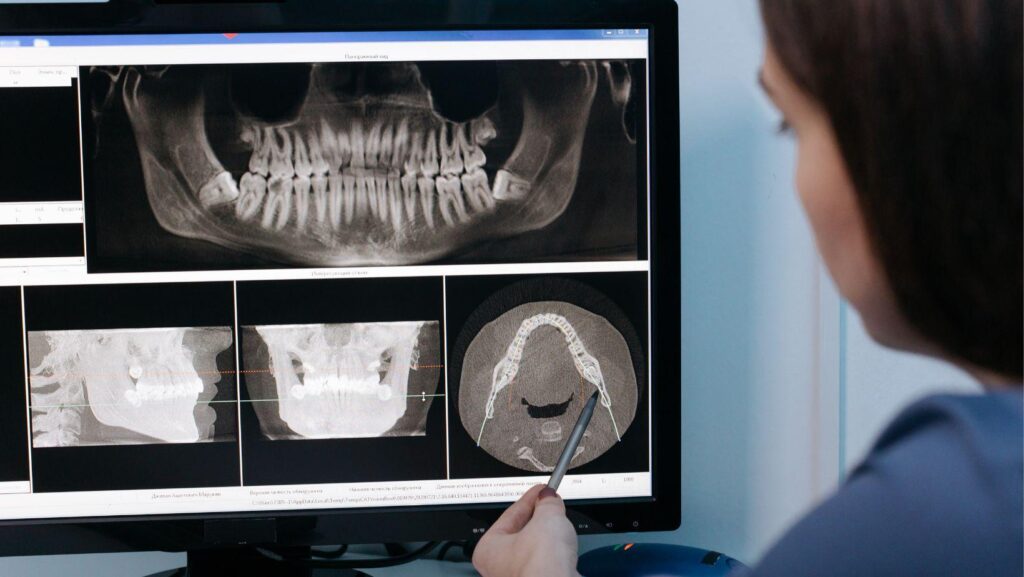
Initial Diagnostic Imaging and Planning
Start with a cone-beam CT (CBCT) scan. This gives a detailed 3D look at your zygomatic bone, sinus, and other structures—essential for planning.
Digital planning software helps map out implant length, angle, and where the prosthesis will emerge. If your anatomy’s complicated, surgical guides can boost accuracy.
Your restorative team will weigh in too, making sure implant heads line up with the planned prosthesis. If you have sinus or airway issues, clear those up before surgery to lower your risk of problems after.
Surgical Approach and Prosthetic Integration
You’ll go through a process that focuses on locking the implant into your zygomatic bone and then restoring function and looks with a prosthesis. The whole approach relies on careful planning and precise placement.
Key Steps of the Zygomatic Implant Procedure
It all starts with detailed imaging—CBCT scans and virtual planning to map out bone and sinus anatomy. Planning software sets the entry point, angle, and final position for the implant.
Surgery usually involves a crestal or limited flap, though sometimes a flapless method works if your bone and tissue allow. The surgeon drills through the upper jaw and into the cheekbone, keeping things cool and under control.
They aim for solid stability by engaging both sides of the zygoma. Depending on your situation, you might get one to four zygomatic implants, sometimes paired with regular implants in the front.
Careful soft tissue management and closing up without tension help prevent wound problems.
Prosthesis Attachment and Customization
Your dentist plans the prosthesis before final implant placement to guide the angle and depth. If your implants are stable enough (insertion torque around 25–35 Ncm and good ISQ), you can sometimes get a provisional or even a fixed prosthesis right away.
The prosthesis framework needs to fit the implant emergence paths, so angled or multi-unit abutments are often used. Material choice—titanium, composite, or ceramic—depends on your bite and whether you grind your teeth.
At try-in, they’ll check your bite and tweak as needed to spread out the forces. Maintenance matters: plan for screw checks, easy cleaning, and regular X-rays to keep an eye on bone levels.
Anesthesia and Intraoperative Considerations
Most people get general anesthesia or deep sedation for comfort and airway safety, though sometimes conscious sedation with local blocks is enough.
A maxillofacial team should be on hand, just in case. They’ll use antibiotics and steroids to cut down on infection and swelling, following the clinic’s protocols.
During drilling, they monitor torque, nerve location, and sinus membrane. Grafting materials and hemostatic agents are kept nearby in case of trouble.
Surgical guides or navigation systems can help with tricky anatomy. The team documents every detail—implant length, angle, and any issues—for future reference.
Benefits, Outcomes, and Quality of Life
Zygomatic implants let you skip big grafts, cut down treatment time, and often get fixed teeth quickly. They tap into the dense cheekbone, giving stability where your upper jaw just doesn’t have enough bone.
Predictable Results for Complex Cases
These implants lock into the zygomatic bone, which is much denser than atrophic upper jaw bone. That means less reliance on unpredictable grafts.
You might get a temporary fixed prosthesis within a day or two since these implants often achieve great primary stability. Studies show high survival rates when skilled teams do the work, but results still depend on technique and anatomy.
CBCT scans help map out the best path, and surgical experience matters a lot. The right implant length, angle, and soft tissue care all affect long-term results.
Impact on Oral Function and Aesthetics
Zygomatic implants restore chewing power by supporting fixed full-arch prostheses. You can usually get back to a normal diet faster than with dentures.
Anchoring to the cheekbone improves how your bite feels and functions. A well-designed prosthesis also gives better speech and lip support, so you’ll likely notice clearer speech and a more natural facial profile.
The prosthetic plan—how your teeth are set up and how the gums look—matters just as much as where the implants go. If immediate loading is possible, you’ll see quick functional improvements.
Sinus care and oral hygiene after surgery play a big role in how comfortable and healthy things feel over time.
Longevity and Maintenance of Restorations
Zygomatic implants usually last a long time when placed by experienced teams, but the prosthesis design and your hygiene habits are key.
Screw-retained full-arch prostheses make repairs and maintenance easier than cemented ones. You’ll need regular checkups, X-rays as needed, and professional cleanings to keep tissues and sinuses healthy.
Maintenance means checking and tightening screws, adjusting your bite, and fixing any worn or broken teeth. If you catch issues like sinusitis, tissue problems, or prosthetic wear early, they’re usually manageable.
A personalized maintenance plan and clear hygiene instructions help you keep your new teeth working well and avoid big repairs down the road.
Potential Risks and Postoperative Management
Zygomatic implants come with their own set of surgical and healing risks. It’s important to know what to watch for, how to handle symptoms, and what aftercare steps you’ll need to follow.
Possible Complications and Management Strategies
You might run into sinus issues, infection, gum recession, numbness, or even implant failure. Sinusitis can show up as congestion, pus, or facial pain—usually managed with decongestants, saline rinses, and antibiotics prescribed by your surgeon.
If infection sets in around the implant, your dentist will check if you need cleaning, antibiotics, or, in rare cases, implant removal if bone loss or ongoing infection is present.
Gum problems like mucositis or recession call for careful hygiene, short-term chlorhexidine rinses, and frequent professional cleanings, especially early on.
If you notice numbness or tingling, get checked out right away. Most of these symptoms fade, but if they stick around, you may need a specialist.
Let your dentist know about any prosthetic issues—loose screws or changes in your bite—so they can fix things before bigger problems develop. Regular X-rays help spot bone loss early.
Recovery Process and Patient Aftercare Guidance
You'll probably notice moderate swelling and bruising for about 7–14 days. Most folks manage pain using prescribed painkillers and cold packs.
Try to rest with your head elevated for the first 48–72 hours. Definitely skip bending over or heavy lifting—that just makes bleeding and puffiness worse.
Your surgeon might want you on a soft-food diet for anywhere from 2 to 6 weeks. Don't chew directly on the implant sites until your prosthesis has been checked and tightened, even if you're tempted.
Smoking? Stop if you can. Tobacco makes infection and implant failure way more likely.
For oral care, gently brush away from the surgical spots during the first week. After that, you can brush normally, just take it easy.
Rinse with saline or whatever antiseptic your provider recommends, twice a day. That's not too hard to remember.
Go to your scheduled follow-ups at 1 week, 2–4 weeks, 3 months, and then every 6 months for the first couple years. It might feel like a lot, but it's important.
If you get a fever, can't control the pain, notice persistent drainage, sudden implant movement, or your face swells up more than expected, call your provider right away. Keep a simple log of your symptoms and meds—it actually helps at your appointments.